
Welcome to our home!
We have lived in our house for over 16 years and have slowly made it our own. It took time to figure out my style, but I love my home and how it represents our family. If your home isn't where you want it to be, these 10 tips to help you love your home may help!
I often get questions regarding paint colors and decor used throughout my home. I love thrifting and antiquing, so much of the furniture and decor in my home comes from thrift stores, Facebook Marketplace, auctions, flea markets, or antique stores. I tried to source products for you to get a similar look!
Affiliate links have been provided
.png "Vintage Modern home tour. www.littlehouseoffour.com #modernfarmhouse #hometour #vintagemodern #industrialmodern #highcontrast")
YOU MAY FIND THESE POSTS HELPFUL:
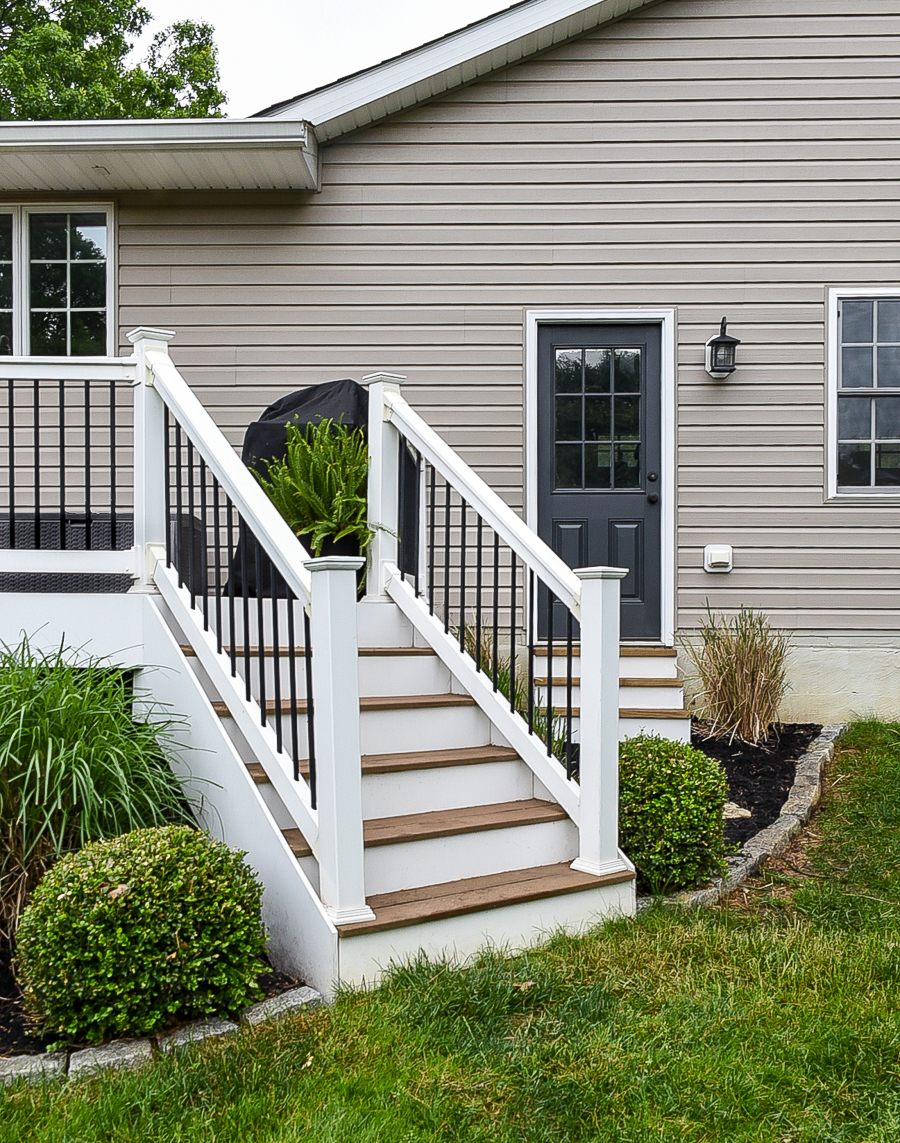
- FRONT PORCH -

DOOR COLOR: Sherwin-Williams Iron Ore
SIDING COLOR: Stone Clay
- MUDROOM -
.jpg "Vintage Modern home tour. www.littlehouseoffour.com #modernfarmhouse #hometour #vintagemodern #industrialmodern #highcontrast")
.jpg "Vintage Modern home tour. www.littlehouseoffour.com #modernfarmhouse #hometour #vintagemodern #industrialmodern #highcontrast")
.jpg "Vintage Modern home tour. www.littlehouseoffour.com #modernfarmhouse #hometour #vintagemodern #industrialmodern #highcontrast")
WALL COLOR: Sherwin-Williams Super Paint Semi-Gloss
DOOR COLOR: Sherwin-Williams Iron Ore
.png "Get the Look")

- DINING ROOM -


WALL AND DOOR COLOR: Sherwin-Williams Super Iron Ore
TRIM AND BOARD AND BATTEN COLOR: Sherwin-Williams Semi-Gloss White (Super Paint)


- KITCHEN -


- HALL BATHROOM-

WALL COLOR: Sherwin-Williams Comfort Gray
DOOR COLOR: Sherwin-Williams Iron Ore
.png "get the look")
- LIVING ROOM -

BOARD AND BATTEN WALL COLOR: Sherwin-Williams Super Paint Semi-Gloss
WALL COLOR: Sherwin-Williams Accessible Beige
DOOR COLOR: Sherwin-Williams Iron Ore
PI WALL ART: Wayfair
- HALLWAY -


DARK WALL: Sherwin-Williams Iron Ore
DOORS: Sherwin-Williams Iron Ore
WALLS: Sherwin-Williams Super Paint Gloss


- MASTER BEDROOM -

DARK WALL: Sherwin-Williams Iron Ore
LIGHT WALL: Sherwin-Williams Worldly Gray
DOOR COLOR: Sherwin-Williams Iron Ore

- HOME OFFICE-


TRIM, WALL, AND DOOR COLOR: Sherwin-Williams Iron Ore
TOP WALL COLOR: Sherwin-Williams Super Paint Satin
- BASEMENT BATHROOM -


WALL COLOR: Sherwin-Williams On The Rocks
DOOR COLOR: Sherwin-Williams Iron Ore
.png "get the look")
- BASEMENT -


WALL COLOR: Sherwin-Williams Accessible Beige
DOOR COLOR: Sherwin-Williams Iron Ore
BOARD AND BATTEN COLOR: Sherwin-Williams Super Paint Semi-Gloss

- DECK / SHED-

- WINTER HOME TOUR -

Did I miss something? Please don't hesitate to shoot me a message on Instagram. It's the easiest way to contact me and I should be able to respond to you within a few hours.


You have a lovely home, I discovered your blog from a comment left on Living Well on the Cheap. I love your comfy and homey style...so cute!!! Thanks for sharing!
ReplyDeleteAww, thanks Cindy! You are so kind :) I appreciate you stopping by and commenting.
DeleteHi Katie,
ReplyDeleteI came across you from a comment you left on I heart organising (the name of your blog was so sweet that I thought I'd visit). Anyway, just want to say that it's so nice to see how you've made your house into a lovely home for your family. Your blog feels "real". Thanks for sharing.
It was so sweet of you to say such kind words and I really appreciate you taking the time to stop by.
DeleteThis comment has been removed by the author.
ReplyDeleteLovely tour! You have such great taste! Glad I found you. :)
ReplyDeleteKaren | a house full of sunshine
Thanks so much Karen! You really know how to make a girl smile :)
ReplyDeleteHi Katie, I just found your blog. I went through your home tour and remembered pinning your entry table. You have such a beautiful home.
ReplyDeleteHi Nikki! How cool that you pinned my entry table and now here you are. Thank you so much for stopping by and taking the time to comment. You are so sweet!
DeleteHi Katie. I found your blog from your wall paper file cabinet transformation and I just love your home and your style!
ReplyDelete-Dez
http://www.lifeasdez.blogspot.com
Thanks so much Dez, you are so sweet! I really appreciate you taking the time to stop by and hope you stick around. I'll be sure to go check out your blog as well!
DeleteI just found your blog via the Work It Wednesday Link Up. I immediately started following you! Your house is AAAmazing! I think I said, "wow" out loud to myself! Thanks for sharing. :)
ReplyDeleteYou really know how to make a girl smile :) Thank you so much for stopping by and following along!
DeleteKatie your home is DARLING! I LOVE all the colors & extras you have put into your ranch. I also live in a smaller ranch ,it's nice to see someone with a similar layout with so much charm!!!
ReplyDeletePaige.Rose
www.TheQuaintSanctuary.blogspot.com
Paige you are so sweet! Thanks so much for stopping by :)
DeleteHello! Absolutely love your home! Do you mind posting the names of all the paint colors you chose in each room photo? Also, where did you get your bedroom furniture and linens as well as dining room furniture? Thanks so much!
ReplyDeleteHi Gia! Thanks SO much for stopping by. You can find most of the paint colors in my house here: http://littlehouseoffour.blogspot.com/2014/03/paint-colors-of-my-little-house.html
DeleteBelieve it or not, our bedroom furniture is a mix of our old childhood furniture that I painted black about 10 years ago. The armoire was from Target a few years ago, the comforter is from West Elm and the pillows are a mix of HomeGoods finds and fabric that I purchased and made into pillows. The dark dining room furniture is from Crate and Barrel and the vintage server is from a local Vintage market. Hope that helps!
I pinned the pallet frames and when I came back to make sure I was ready to make them, I clicked on the home tour and I must say I LOVE the feeling of your home... the colors, the décor, its everything I have been picturing for our home!! Very envious ...and inspired! Thank you
ReplyDeleteYou have such a pretty house! I love love love the curtains in the master bedroom... I'm not sure why since it's such a little thing but they just jumped out at me! Either way love the whole house!
ReplyDeleteYour home looks so comfortable. The way you added color throughout looks great. I actually used the same fabric as your master bedroom curtains for the curtains in my kitchen! I think they are my favorite curtains in our house.
ReplyDeletewow, so inspirational. Just discovered your blog and can't get over how similar our situations seem to be. We're in a small ranch that is probably going to be our forever house. We are finally getting around to renovating our master bath but I'm dying to do a kitchen and mudroom makeover/addition (and possibly a room over the garage). Your home is beautiful!
ReplyDeleteYour home is beautiful! I'm pretty much in love with your style, and all of your projects! I could get lost in your blog for hours!
ReplyDeleteI stumpled upon your site via a comment on Migonis Home Blog this morning....you have a lovely home! I look forward to all of your future posts!
ReplyDeleteThanks Beth! It's so nice to have you here and I really appreciate you taking the time to stop by.
DeleteYou have a beautiful home! Y'all have done a great job!
ReplyDeleteI love your updates and your house is beautiful! I wish I had that vision.....you have helped inspire me!
ReplyDeleteJust lookin through pinterest for some homes with black interior doors and came across your blog. I love the improvements you have made to make this house your own! I see that you have kept white trim around you black doors and I think it looks great! I think I may just be off to purchase some paint and take the black door plunge!! Thanks for the inspiration. I am your newest follower, hope you will come on over to the country as well.
ReplyDeleteYour home is lovely. I want a new front door! Exactly like yours!
ReplyDeleteI Love your style. Your master bedroom curtains are darling, I love the colors in them, can you tell me where you found/bought them at. Thank You
ReplyDeleteI absolutely love your eye for home decor! I am slowly filling out her house & am glad I came across your blog for inspiration & your DIYs. I am curious as to the significance for the number 4? I have seen it featured in a few rooms. Either way, I enjoyed that little design feature.
ReplyDeleteI just discovered your website today from Pinterest. I must say, I really love it, you have incredible taste and skills. Thanks for all the beautiful ideas.
ReplyDeleteHi Katie,
ReplyDeleteThank you for telling me about your blog the other night at the party! I really enjoyed talking to you guys and love your blog. You have done a beautiful job on your home. Obviuosly it is your passion and I love your style. Really love the chevron print and the stripes - just beautiful! Follow your Dream!
Just adore your blog and your home is incredible. I've recently moved into a new home with my two daughters and am so inspired by your posts. First of what will be many questions... paint color in the hallway? The same SW Well Balanced Beige used in other areas? Thank you so much and I'm so grateful to have found your site!
ReplyDeleteThank you so much, Sarah! It's always nice to have new faces around here. Yes, the hallway is painted Sherwin-Williams Balanced Beige, which is the same as the living room.
DeleteOh Katie, your home is so beautiful. So happy to be a part of your blog.
ReplyDeleteWhere did you get the round coffee table in front of the fireplace in the basement?
ReplyDeleteIt's from World Market! Just search "Tribal Coffee Table" and it will pop up :)
DeleteWhere did you find the rug under your dining room table? It's beautiful!
ReplyDeleteHi! It was purchased from HomeGoods a few years ago. Sorry, I don't have a link and I have never seen one like it :(
DeleteNew subscriber here! I can hardly wait to look through all your projects! I would love to know where you got your 3 light chandelier in your kitchen. Thanks!
ReplyDeleteWelcome, I'm so glad you found my blog! The kitchen light was purchased from Home Depot about 10 years ago. I'm not sure if they still sell the same light, but they may have something similar.
DeleteI think you are a very cool visionary. I like the fact that your home is crisp & cozy not sterile nor austere. I appreciate the classic palette, which doesn't feel to be a trap ~ swap outs of accent colours for a little fun & or working really well with seasonal moods too ! Indeed I enjoyed placement as well as appointment ~ my eyes were not bored, my brain happily delighted. I've always tried to explain when asked the difference between trends vs: classics; "Most certainly a trend will end, where as the classic's will last & that's a fact" ~Roxi L. Respectfully & happily enjoyed your tour, Roxi Lees ~ Mrs.Woof@yahoo.com
ReplyDeleteLOVE the look of your home. I actually used these photos to convince my boyfriend to paint our doors Iron Ore (we had already painted most rooms Accessible Beige) AND add white shiplap to our entryway! Don't think I could've convinced him it was a great idea without your photos...so THANK YOU!
ReplyDeletejust discover your site and i love it, and your home is so beautiful.
ReplyDeleteNice tour. Thanks for sharing!
ReplyDeleteYou’re home is amazing! Seeing this post I have pinned quite a few things before! It’s funny to think that such a bold color could be used through out the entire house yet be so subtle and lovely. I’m painting my doors about the same color (I scored two gallons of it for $10 in the discount paint section!) you’ve given me inspiration to let my whole house look like this! I’m even obsessed with wicker and wood everythingggg! Thank you for sharing your home!
ReplyDeleteWe have never lived in anything other than Ranch homes, and honestly, we find them extremely comfortable, and able to take on nearly any personality. Ranches were meant to be changed, and added on to, as the family grew and changed. They have so much potential that a lot of people simply don't want to see. The 'lowly ranch' I've often heard them referred to as.
ReplyDeleteI grew up in an old Craftsman, and later an old farmhouse. My husband grew up in a 1958 ranch. Our first home was a 1973 split level ranch, our second a brand spankin' new ranch (light, bright, airy, but no personality. at. all.), and our third and current home, a 1972 ranch. The latter we've lived in the longest, and done the most to. I use color on the walls, although I am starting to come back around to white. I want to paint our interior hollow core doors black (until I can budget my 'dream' doors), but haven't quite gotten hubby around to the idea. Yet. ;)
Thanks for sharing your home.
I'm so glad I found you!! It's so hard to mesh modern and farmhouse but you have done it perfectly! We just moved in to a new home and I'll be using your blog as inspiration.
ReplyDeleteHello, I have been looking for a color pallettte where I can actually see the colors in a room and I love your style. I read in another post you used sherwin williams off the shelf, is that a white off the shelf or and actual color and thename is off the shelf. I have not been able to find it on their color chart so I am assuming its a white they sale unmixed. Thank you
ReplyDeleteHi! Yes, the white paint that I used throughout my home is Sherwin-Williams Super Paint unmixed semi-gloss. It's their lower grade paint, but I started with it over 12 years ago I just stuck with it.
Delete