
Do you love the look of authentic vintage sleigh bells, but can't find them or justify the cost? With this easy DIY, you can easily transform inexpensive bells into perfect vintage-inspired sleigh bells!
Who's up for an easy budget-friendly Christmas project?
I've been shopping early this holiday season and snagging lots of faux winter greenery, affordable Christmas decor and gifts whenever I see something that catches my eye.
Recently, while scoping out Christmas decor at Walmart, I came across oversized jingle bells that I had to have. They were great as is, but I knew I could make them better with an easy vintage-inspired makeover.

Authentic sleigh bells are one of my favorite vintage items to hunt for and collect. I have a few sets that I display every Christmas and the rest I pass along and share with others in my vintage shop.

Since vintage bells can be expensive and hard to find, I decided to create a knockoff version using the Walmart bells and my own authentic sleigh bells as inspiration.
- SUPPLIES TO MAKE VINTAGE-INSPIRED SLEIGH BELLS-
Affiliate links have been used
- Fusion Mineral Paint (Coal Black)
- Craft paintbrush
- Paper towels
- HOW TO MAKE VINTAGE-INSPIRED SLEIGH BELLS -
As soon as I saw these large bells at Walmart I knew I wanted to buy a few. They come in three colors, are less than $4 a piece and are perfect for winter and Christmas decor.

I'm no stranger to achieving the perfect vintage-inspired look with paint (I used a similar technique on hanging bells last year), but aging new items never gets old, and every project is a little different.
I started by wrapping painter's tape around the rope where it attaches to the bell then sprayed the bells with a few light coats of gold spray paint (I like to start with a gold base coat.) Be sure to let each coat fully dry before applying another coat.
(If you do not plan on keeping the rope then remove it prior to spray painting)


After the spray paint was dry, I dug through my paint stash and picked a few colors to "age" the bell. I ended up using Fusion Mineral Paint in Coal Black, FolkArt Metallic Gold and FolkArt Metallic Antique Silver.
First, I applied a coat of Coal Black and let the paint dry for a few minutes. While the paint was still a little tacky, I blended in the metallic gold and silver paint. I let the paint dry slightly after each coat and kept adding colors and blending until I was happy with the final "aged" product.
***TIP*** It's easier to blend the colors while the paint is still wet. If your paint dries too quickly, you can add a little water to your brush to help with blending.


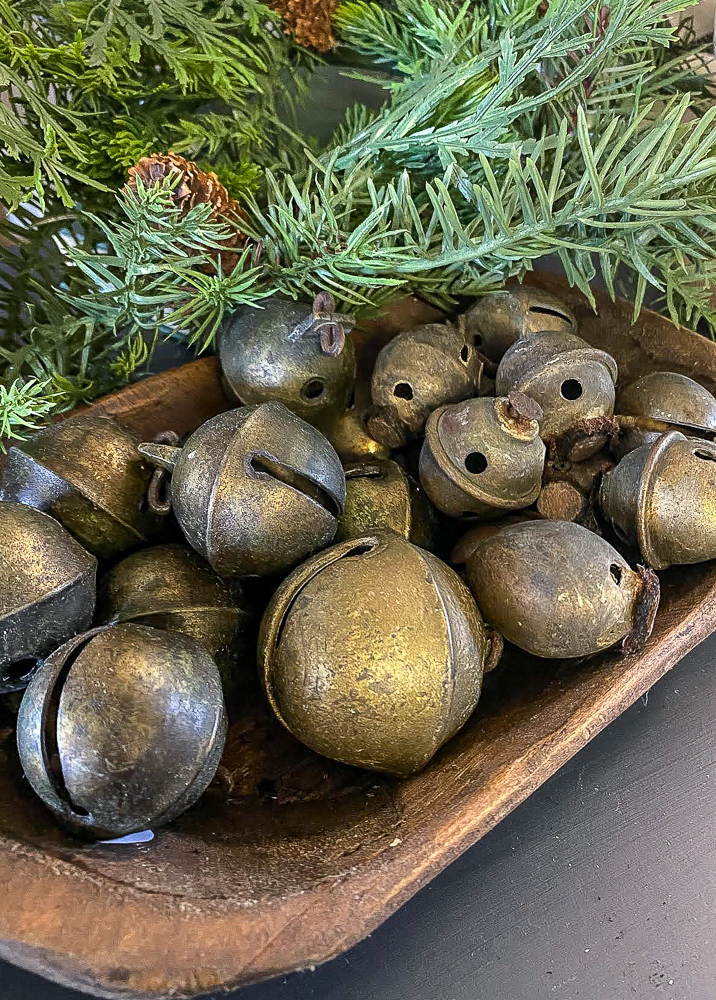
I originally planned on keeping the rope, but ultimately, decided to remove the rope and style the vintage-inspired bells in a large wooden bowl on my island. You can always keep the rope and hang the bells from a large wreath or pair a few together and display them cascading from a hook.


The change is subtle, but the combination of gold, black and silver add just the right amount of "age" and dimension to these once basic bells.


I read this and ran to Walmart to pick up 3 of the Jingle Bells. So excited to make this weekend. Thank you for the very cute idea.
ReplyDeleteHappy Holidays!!
Always a fan of how you DIY vintage stuff. I did recreate your vintage jars out of dollar tree jars. Thank you so much!
ReplyDeleteBoy you sure made those look better! They are seriously gorgeous now!
ReplyDelete